
I have been a record person/human since my grandfather introduced me to his fantastic collection where Sinatra rocked his world, then came my dad with his undying love for the Backstreet Boys, and now I am somewhat of a Bruno Mars/Ed Sheeran lover myself, so you can imagine how many record players I have seen and how big our collection must be- IT’S HUGE. We go hard! Another thing that my grandfather taught me was how to change needle on record player, but before we come to that part, let’s continue with my story.
Music in our home is always on for the vibes in the background, so much so that I can literally re-live my entire life through albums we have loved.
This also gave me an opportunity to understand record players- what works for different homes, different layouts, different tastes, and preferences. I have also helped my grandfather repair his first gramophone as he could never let it go while also helping my dad set up his own studio to sell everything music. Knowing that not everyone is so obsessed and exposed to this world, I thought I might as well help, so allow me to make it easier for you and assist you to change needle on your tunrtable.
FIRST- Let us understand what the needle/stylus does.
Before we go directly to the replacement steps, let us understand how a needle helps produce sound in your turntable.
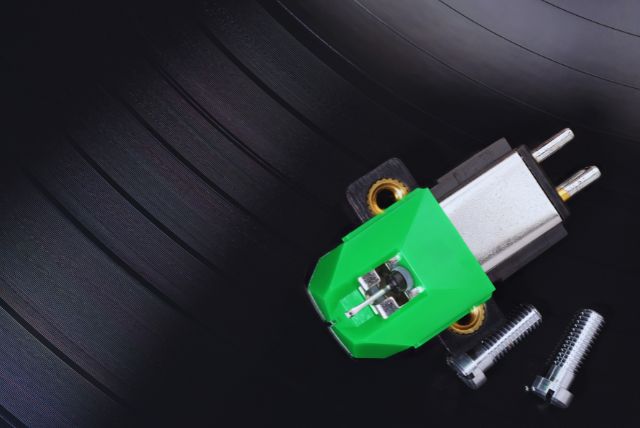
The needle, also called the stylus, connects to the cartridge from one end and comes in contact with the record grooves from another while playing. The needle tip is generally made of diamond to endure the constant rotations on the vinyl record.
So, what exactly does a needle do in a record player?
I know it will be a bit technical, but I will explain it in the easiest way possible.
When a record is loaded on the platter, and the tonearm is placed parallel to it, the needle starts reading from the outermost groove towards inward on the vinyl record. The vibrations produced by the grooves are then transferred through the cantilever to the magnet and to the coil that produces small electrical signals.
These signals get a little boost from the preamp and are later amplified by the amplifier, thus creating the sound from the speakers. And that’s how your turntable produces sound.
SECOND- Things to check before you change the needle on record player
Here are some of the things I want you to remember before ordering the replacement parts.
The first thing is to examine whether the stylus can be removed. If the stylus can be removed, you only need to order a replacement of it. And if not, it means it’s built into the cartridge, and you’ll need to replace the entire cartridge. Usually, you don’t have to replace your cartridge for decades, but if the stylus is built in, you don’t have any other choice.
The second is to check the make and model of your turntable and order replacement parts by visiting the manufacturer’s website. You can also purchase new parts from the electronic store if you are familiar with the appropriate needle or the cartridge for your player.
If in case you want to enhance your turntable sound, you can also order a different type of needle. Before ordering, visit the manufacturer’s website and check if it’s compatible with your turntable.
There are four different needle types; for more detailed information on them, you can read the article here.
THIRD- Gathering the required tools and parts
Once you have ordered the replacement parts, there are a few tools that you need to gather to replace your stylus successfully. While some are extremely important, some can be skipped.
Here is the list of things you need to gather:
- Replacement Needle (of course): Keep the replacement needle you purchased for your record player. I mention it so you remember to keep it available before replacing it.
- Steady Hand: I know it’s not a tool, but it’s essential for a delicate task like this. If you don’t keep your hands steady, there are higher chances that you might damage any part of the record player.
- Screwdriver: Required to fasten the nuts on the cartridge.
- Needle-nose pliers or tweezers: Helps to connect the head shell wires to the pins on the cartridge.
- Replacement cartridge: If it’s the first time you replace your needle after years of use or the stylus is built into the cartridge, you must also replace it. So, keep it handy as well.
- Stylus force gauge (optional): If your record player already has a built-in scale to measure the downward tracking force, skip this part; if not, get a stylus force gauge to set the appropriate tracking force once you replace the stylus.
FOURTH – Replacing the needle/ stylus and cartridge
The steps I list below will work for most record players produced after the 80’s. You don’t have to worry about the specific make and model until yours is too old!
For replacing only the needle:
Step 1: Unplug the record player and hold the tonearm still with your least used Hand.
Step 2: Gently, using your dominant Hand, pull the old needle out from the cartridge. If it’s difficult to remove with bare hands, use the needle-nose pliers for additional help.
Step 3: If the new needle comes with an instruction manual, read the instructions to perform the replacement. If not, hold the head shell still with your least dominant Hand. Then, gently insert the needle by holding the top of it and pushing it slightly into the cartridge. When you hear the clicking sound, your new needle is installed and ready to play some records!
For replacing the entire cartridge:
Step 4: If you replace the entire cartridge, ensure your hands are clean and don’t have dirt or oil on them before taking the needle off. After that, gently pull out the needle from the cartridge using your finger.
Step 5: Now use the nose-plier to gently pull each of the four wires (red, blue, green, white) out from the pins that connect the cartridge with the tonearm. Apply limited force to protect wires from any damage.
Step 6: Two screws are holding the cartridge with a head shell. Use the screwdriver to unscrew the cartridge from the cartridge carrier or the head shell. With screws removed, slide the cartridge out of the slot.
Step 7: Install the new cartridge with the screwdriver and the nuts. Don’t tighten the nuts at this step, as you need little room to make adjustments later.
Step 8: Connect the head shell wires to the pins on the cartridge using needle nose pliers or tweezers. The wires should be connected to the pins according to their colour: red wire to the red pin and blue wire to the blue pin. The same goes for the white and the green wire. Be extra careful at this step. If you accidentally break or damage the wires, you need to take your record player to a repair shop.
Step 9: Hold the needle from the back and carefully put it back into the cartridge. Be gentle and avoid using too much force.
Step 10: In the next step, ensure the needle is aligned correctly. If your record player comes equipped with an overhang gauge, use the markings on the gauge to align the needle correctly. If it comes with a paper protractor, use the cartridge marks to align the needle properly.
Step 11: Once you have reached a perfect alignment, tighten the nuts to secure the cartridge carrier. While fasting the nuts, ensure you don’t over-tighten them, or else you can break or twist the cartridge.
Step 12: We will check and adjust the tracking force at this step. Start by turning the small knob, called the anti-skating dial, next to the arm to zero. Then, lower the cueing lever and adjust the arm so that it is parallel to the turntable platter.
Step 13: If the turntable came with an inbuilt tracking force scale, use it to adjust the tracking force. Check its user manual for recommended tracking force value. If your record player doesn’t have a built-in scale, use the stylus force gauge to measure the tracking force and set your record player accordingly. It comes with an instruction manual for proper use.
Step 14: Set the anti-skating knob setting to the recommended tracking force value.
Step 15: Ensure that your record player’s arm can be adjusted for height and azimuth. The arm height should be set to match the level of the platter when the record is playing. When it touches the record, the azimuth should be set so the needle is straight up and down, like a T. If your record player doesn’t have settings for adjusting the arm height or azimuth, don’t worry. Not all record players have these options.
Step 16: Your new needle is installed and ready to play your favorite records. All you have to do is sit back and enjoy your favorite music.
JUST SO YOU KNOW: The most expensive turntable in the world is the Continuum Caliburn, which costs $112,000- FULLY LOADED, and yours truly aspires to have it someday <3
Final beat
Changing the turntable needle or entire cartridge is easy if you know the proper steps. The best part is that the right instructions can save you from the hassle of taking your player to the electronic store for a replacement.
After reading the steps, you can install your new stylus or the complete cartridge with ease. If you are facing any problems or have any queries, feel free to comment below, and I will be more than happy to help you!
MUST, MUST READ: