
My brother once bought a record at a local garage sale. He called me and told me, “Hey Russ, you know what? I just purchased a record at this garage sale, and I want to gift it to you.” I was happy and thankful for his kind gesture, but deep down, I knew it was hard to find a scratch-free record in a garage sale. However, as a vinyl enthusiast, I already know how to fix a scratched vinyl record.
When he gifted me the record, I did a quick analysis of the record surface, and I was surprised. It was still in decent shape, with just a few scratches that could be fixed with the methods I am going to share with you guys.
But before that, let us understand the different types of scratches.
There are two types of scratches:
- Minor scratches: These scratches only cause a crackle or pop while playback.
- Deep Scratches: These scratches cause the record to skip.
However not all scratches are culprit that distorts sound. Sometimes, a scratch will only ruin the aesthetics of the record, leaving the playability intact.
While there are methods through which you can fix surface scratches, there are times when a record can’t be fixed.
How to check if the record is beyond repairable?
If you are able to feel the scratch with your fingernail, it’s could be the time to bid it goodbye. But don’t give up hope just yet; you can save some old records. It’s about knowing when to keep trying and when to stop.
There are methods through which you can fix the visible and audible scratches on your record. But its important to follow them with caution as an incorrect method can further damage the record and make it beyond repairable. When in doubt, it’s always a good idea to reach out to an experienced record collector for some guidance.
Initial preparation before executing the fix
Before you make your hands dirty, here are some of the things that you need to do.
Clean the record surface
Clean your record with a carbon fibre brush and a cleaning solution to remove any dust and debris present on the surface. It is important to clean the record before going ahead with fixation to avoid any further contamination of the surface. In addition to that, a clean surface ensures a smoother repair, reducing the chances of further damage.
Locating the scratches
Use a soft light to determine the location of the scratches. Viewing the record from different angles under the light can help you identify scratches better. It’s important to figure out exactly where and how bad the scratches are so it gets easy for you to fix them. You can also use a magnifying glass for hairline scratches that are hard to see.
Different ways to fix scratches on your vinyl records
Finally, the wait is over. Let me tell you two different but practical methods that will help you fix your favourite record.
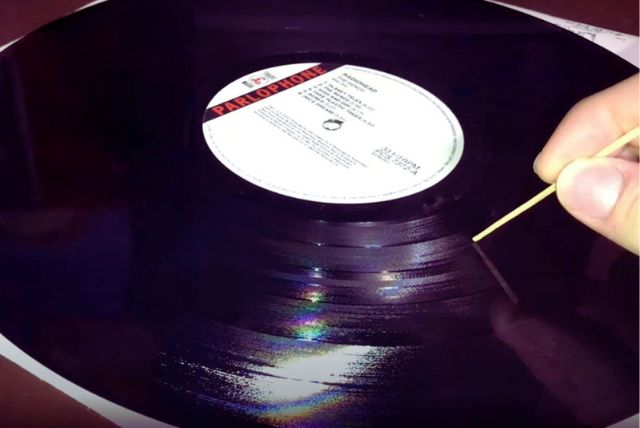
First Method: Use a Toothpick
I know it sounds weird, by trust me, it works wonders to fix small scratches.
Here is how it works: The toothpick helps to align the elevated corners of the groove that are a result of surface scratches. This as a result helps to reduce the amount of distortion produced at the time of the playback.
Steps you need to follow:
- Hold the record from the outer edge: Make sure you hold the record from the outer edge, as holding the record from the inner surface can stick oil from the fingers and will leave fingerprint impressions.
- Place the toothpick on the scratch and press gently: Now, take the toothpick and use its pointed side to gently press the elevated edges of the groove to align them.
- Trace the groove with the toothpick along the scratch: Move the toothpick along the groove, but make sure you don’t move beyond the scratched surface.
- Check if the scratch is fixed: Once you are done with it, test the record on your turntable and check if it still skips or crackles while playing. If everything is good, congrats, you fixed it and if not, repeat steps 2 and 3.
Additional tips
- Be gentle while applying pressure to avoid further damage.
- Use a sharp toothpick for better results.
- If you are unsure how much pressure should be applied, start with applying less pressure.
- If the scratch is big and spread between multiple sections, start with fixing one section at a time.
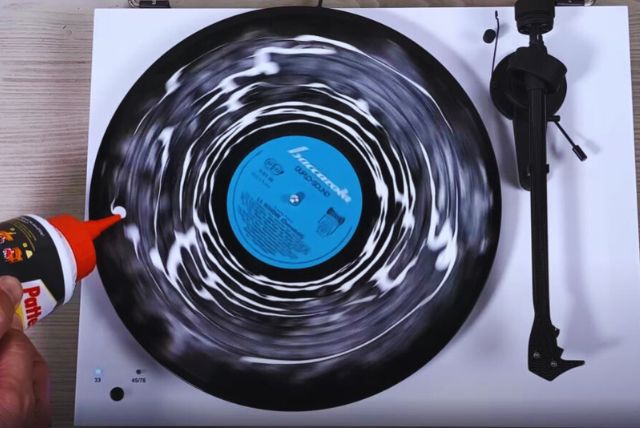
Second Method: Wood Glue (Epoxy) Method
Another amazing method to fix deep scratches that need extra attention is using epoxy or wood glue.
Here is how it works: The wood glue fills up the vinyl grooves, making a smooth path for the needle. When you peel off the glue from the record surface, it removes the rough edges from the scratches, leaving behind smooth grooves that the needle can glide along easily.
Here is how to execute this method:
- Start by cleaning the record. Use a cleaning solution and a record brush to thoroughly clean the record surface for dust, debris, and fingerprint impressions.
- Apply the glue. Now, use a small brush or a toothpick to apply a small quantity of glue. Don’t apply too much, as it would be difficult to peel the glue later.
- Let it dry. Leave the glue on the record surface for a few hours to dry completely.
- Gently peel it: Start peeling the glue from the outer side and then proceed towards the centre of the record. Try to be extremely gentle to avoid any damage to the record.
Additional tips:
- Don’t touch the surface of the record while the glue is drying.
- If the record has a deep scratch, you need to apply multiple layers of glue.
- While using the epoxy, read the manufacturer’s instructions carefully on how to use it.
- If it’s difficult to remove the glue, you can use a wet paper towel to make it easier to remove.
Seek professional Help
If you are not comfortable using toothpick or epoxy on your record, you can consider taking it to a professional who will help you with the repair or at least tell you whether it can be repaired or not.
Fun Fact: In a poll by ICM in 2016, it was found that 48% of folks who purchased vinyl records didn’t actually listen to them.
Ways to prevent damage to your vinyl records
Proper handling
Always, I repeat, always hold the record from the outermost edge and not from the inner surface. The oil present on your fingers can stick to the record surface and can further deteriorate the quality of the record. Proper handling protects your record from unnecessary scratches and ensures it’s playable for years to come.
Clean them regularly
Regular cleaning keeps your record in perfect shape. When you get rid of the dust and debris using a carbon fibre brush and a cleaning solution, your records are much less prone to unnecessary damage. A proper cleaning routine will help your records to stay in pristine quality.
Clean your turntable needle
Not just your records, but your record player needle also needs cleaning once every week. It’s extremely important, as a dirty needle can damage the record over time.
Knowing the correct steps to clean a record player needle is vital to keeping the records in the best shape.
The role of inner and outer sleeves
The inner and outer sleeves play a pivotal role in protecting the record from dust and dirt particles. In addition to that, they also protect the record from unnecessary scratches by taking the record out or keeping it back. Purchasing high-quality anti-static sleeves ensures your records stay in the best shape and are protected from dust.
Selecting the right storage space
Always keep your record away from the sunlight and excess heat. Also, never, I repeat, never stack your records on one another. Rather, keep them in a vertical position. Stacking your records is the worst thing you can do as it ultimately leads to warping.
Another thing you need to ensure is that your storage space is completely cool and dry, as humidity can make the records soft and ultimately damage them over time.
Its always a good idea to be aware of the best ways to store your precious vinyl records.
Final beat
It’s easy to fix minor scratches with the toothpick or wood glue method. But there are times when a scratch is extremely big, and these two methods are not enough to fix it. That’s when you should seek professional Help, or you can keep it playing the way it is if the scratch is not ruining the audio experience.
And if there are no emotions tied to it and that specific record is still available in the stores, buy a new one. Problem solved!
Also, to avoid leading to this situation where your records get scratched, clean them properly, keep them away from excess heat and never stack them on one another. Cheers!